When you get new readers to your blog you want them to stay around and explore.
The secret to this is to make the key navigation points - such as the older & newer posts links - stand out.
In some templates the older & newer post links disappear into the background but as this Mommy Hack shows, it's easy to change the link text and style.
As we're going to edit your template do back up your blog first.
Style Older & Newer Post Links
1. Copy the code below into Notepad so that you can edit it ...
font-size:15px;
color: #a91a00;
font-family: "Georgia", "Times New Roman", serif;
font-weight: Bold;
font-style: normal;
color: #a91a00;
font-family: "Georgia", "Times New Roman", serif;
font-weight: Bold;
font-style: normal;
2. Edit these values to define what you want the font to look like ...
- font-size: to define how big you want the font to be
- color: to define the colour of the font - this can be any of these actual colour names or a hex number
- font-family: the name of the font you want to use plus fonts to use if first choice not available
- font-weight: choose from bold, bolder, lighter, normal
- font-style: choose from italic, oblique, normal
You can also format the border as in the examples covered in my post on jump break styling.
3. Click on the Template link and then click Edit HTML highlighted below ...
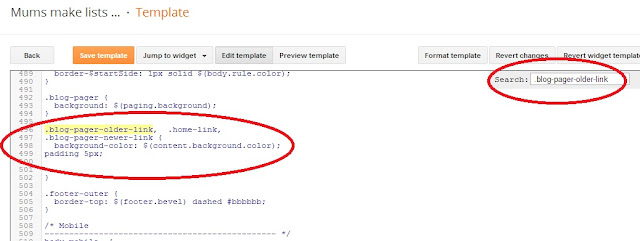
4. Now click carefully inside the scroll box displayed and press Ctrl-F on your keyboard.
Enter the following code into the Search field and press enter: .blog-pager-older-link

5. Copy the code you edited in Notepad and paste it into your template just before the closed curly bracket, i.e. in my example above it would be right after the code: padding 5px;
6. Click Save Template and view your blog.
7. The Older Posts, Newer Posts and Home links will now display in the font and style of your choice.
8. To change the actual text that is displayed repeat steps 3 and 4 above but search for the value: <data:newerPageTitle/> and replace it with the text you want to appear instead of Newer Posts.

9. Repeat step 8 but search for the value: <data:olderPageTitle/> and replace it with the text you want to appear instead of Older Posts.
10. Repeat step 8 again but search for the value: <data:homeMsg/> and replace it with the text you want to appear instead of Home.
11. Now click Save Template and view your blog. Your chosen text will now be displayed in the font and style of your choice .... how cool is that!
If you found this post useful, you might also enjoy my other mommy hacks and for loads of great blogging tips from load of great bloggers check out The Mommy Archive ...


Mommy Hacks Newsletter
This post has been shared at ... Sugar Bee Crafts, Home Stories A to Z, The Shabby Creek Cottage, Joyful Homemaking, Serenity Now, The Gunny Sack, Crystal and Co, Ginger Snap Crafts, Trendy Tree House, Domesblissity, Ladybird Ln, Not Just a Housewife, Clever Chicks, Be Different Act Normal, Sumos Sweet Stuff, Keeping It Simple, Lines Across, Get Your Crafts On, A Bowlful of Lemons, Clean and Scentsible, Delightful Order, We Are That Family, By Stephanie Lynn, Whipperberry, More the Merrier Monday, I Should Be Mopping the Floor, Carolyn's Homework, Shabby Creek Cottage, 36th Avenue, Six Sisters Stuff, 52 Mantels, My Uncommon Slice of Suburbia, Elizabeth and Co, Whatever Goes, Finding Fabulous, The Thrifty Home, Skip to My Lou, Five Little Chefs, Fluster Muster, Creative Princess, DIY Crafty Projects, The DIY'ers, Naturally Living Mamma, Tumbleweed Contessa,Give Me the Goods, Martha Mondays


0 comments